 Configure Your Mega Menus
You can have many tabs, each with many columns, and images. Images may be links, columns may have headers that are links (or not). It is all done with characters (<) and ( >).
SharePoint navigation is defined using the out of the box navigation management, under Site Actions > Site Settings > Navigation, Under "Look and Feel". (If you do not have a "Navigation" link under "Look and feel", please enable "SharePoint Publishing Infrastructure" under "Site Collection Features")
If a tab has the appropriate syntax for grouping then that tab is flipped over to a Mega Menu!
Stuck with syntax issues? Most support calls show you just don't have enough data in the correct pattern.
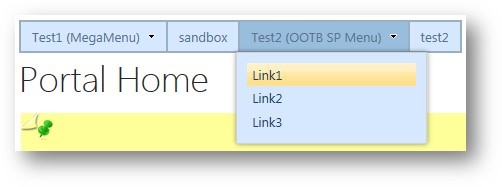
The nav for our main website looks like this...
Overview
Create your main global navigation headings as you normally would, using the Header link.
-
Click on "Add Heading".
-
Enter a "Title" and "URL".
-
Click "OK" to save.
-
Click on "Add Link".
-
Enter a "less than" ( < ) symbol in the "Title" field of your link. This effectively starts a group. Any text entered following the left bracket becomes that group's header title (e.g.
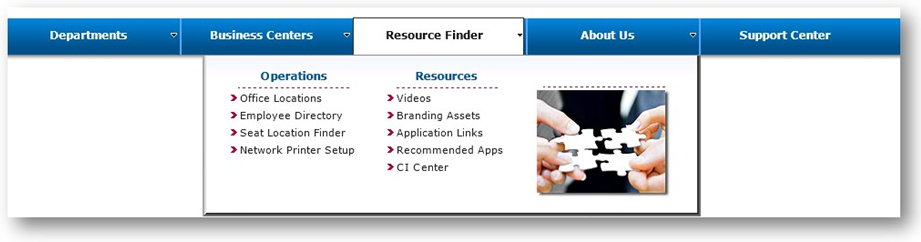
<Resources, see Figure 1 and 2).
-
Alternatively, if no header title is desired, simply enter the "less than" ( < ) symbol with no text following it. This will start the column but will not create a header title.
-
The "URL" field can be:
- Any valid URL, either relative or absolute. (e.g.
/Pages/Videos.aspx or http://intranet.domain.com/pages/videos.aspx)
- Left blank so that the column header is not a clickable link
- If SharePoint does not allow you to leave the URL field blank, you can set URL to /NULL for same effect
-
Click "OK" to save.
-
Click on "Add Link".
-
Enter a "greater than" ( > ) symbol in the "Title" field of your link. This closes a group. The "URL" field should simply be set to a "forward slash" ( / ) symbol (e.g. see Figure 3.)
-
Click "OK" to save.
-
Make sure that this link is at the bottom of the column that you want to enclose (e.g. see that it is below the CI Center
link in Figure 2.)
-
You can do this by selecting the link and using the "Move Up" and "Move Down" buttons to change the links' order.
-
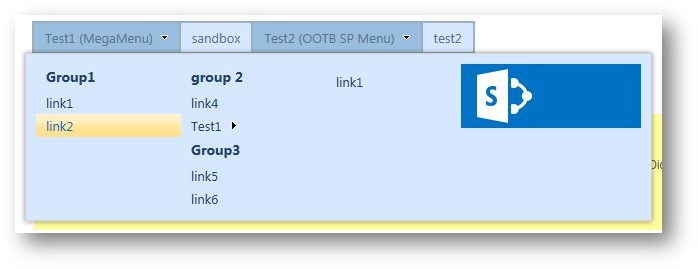
You can create multiple columns within the same heading. We recommend that you use no more than 3 columns in a heading, as the menu may become too wide for most standard screens.
The
IMG: tag specifies an image to display within a Mega Menu column.
-
Click on "Add Link".
-
In the Title Field, enter
IMG: and a hyperlink path to the image that you'd like to put in the Mega Menu "
IMG: /Images/Google.jpg "
-
NOTE - Bear in mind that the images
DO NOT resize, so place an image that is appropriately sized for the menu area.
-
URL field will be the image's clickable hyperlink, either relative or absolute. (e.g. URL=
http://www.google.com
-
Click "OK" to save.
-
Multiple images can be added to one group, as they will be stacked horizontally. However, you will need to test this out to see if mutiple images will fit on your menu layout.
-
You can also put the image in its own column by simply enclosing the image between a pair of opening and closing links (see Figure 2.)
New feature (v13-10) The
HDR: tag specifies additional headers within a Mega Menu column. This allows more options for organization of links.
-
Click on "Add Link".
-
In the Title Field, enter
HDR: in front of a link's title. This will make the title appear as a column header.
-
Click "OK" to save.
We now support MegaMenus with Managed Navigation! All instructions above are valid, with the following exceptions
- Use of angle brackets (< >) to start and close columns should be replaced with square brackets ( [ ] )
- Angle brackets are not supported in the term store and so square brackets are used instead
- Managed navigation does not support having multiple links with the same title, so you get an error if you try to simply close columns with "]" like you would with Structural Navigation. Instead, include the column name after the closing bracket, like so:
- [Group 1
- Link 1
- Link2
- ]Group 1
- Configure your navigation term set for Custom Sort Order. Otherwise your navigation elements will be sorted alphabetically which wrecks the column structure.
The Style configurator (below) is currently only available for SharePoint on-premises. For SharePoint Online, you must use a custom CSS file to style the menus.
From site settings, under "SimpleSharePoint Solutions" group, there is a link called "MegaMenus Style Configurator" that takes you to this page.
From here you can setup colors, font sizes and more.
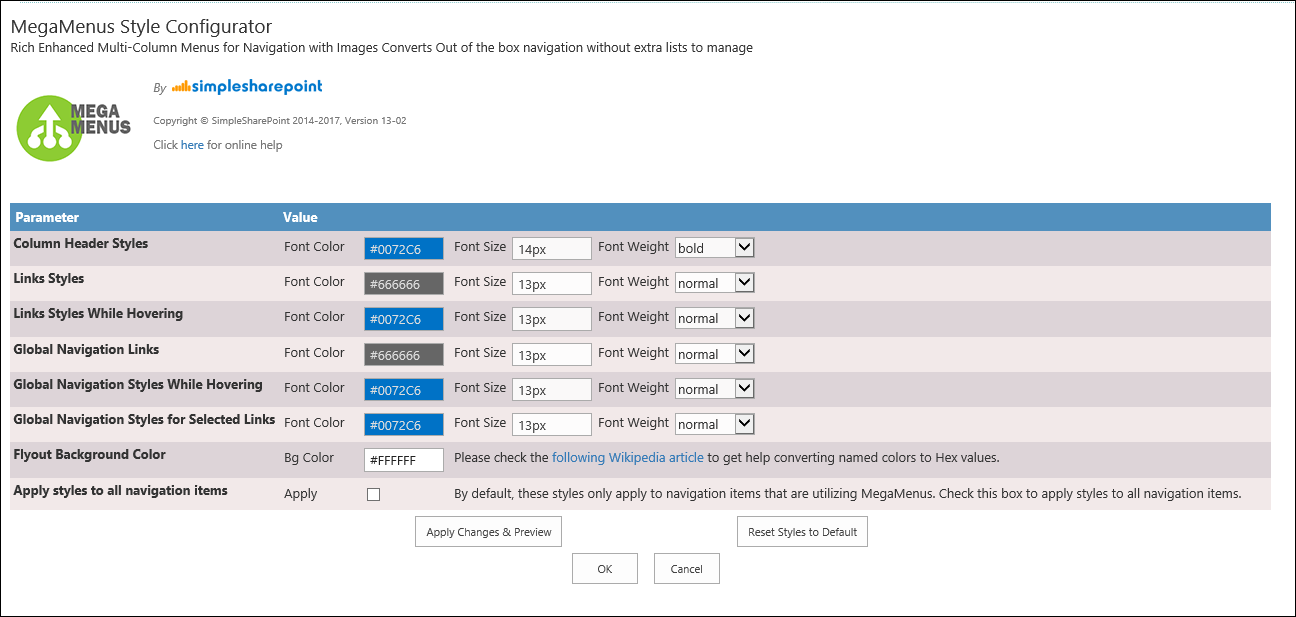
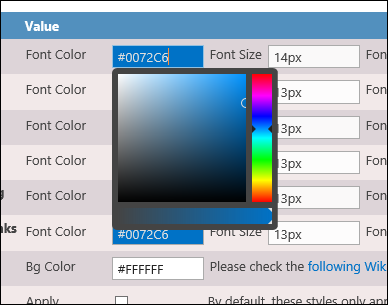
For example, to change Column Header Styles, select a color from color picker tool, or manually enter the desired value in Hex format.
Let's change some styles:
Some dark-green, and make font size bigger (from 14px to 16px), then click "Apply Changes & Preview" button to see results immediately.
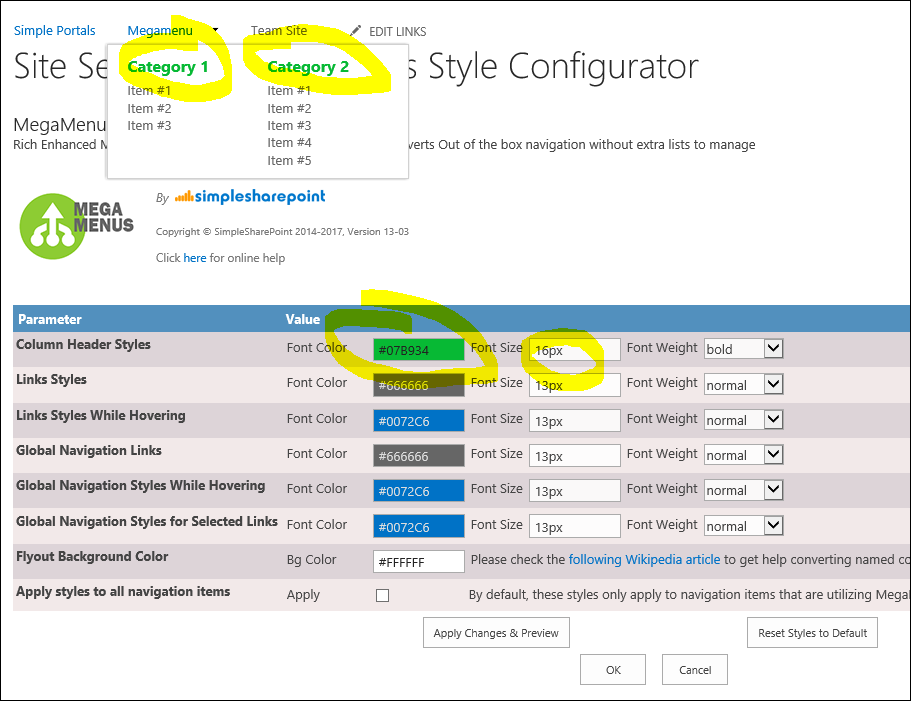
Once you're happy with the results, click OK button to permanently save changes.
If you want to revert styles to the original values, click "Reset Styles to Detault" button.
Custom styling with CSS is useful when you want to make changes that are above and beyond what is available with our Style Configurator. CSS styling is also the only option currently available for the SharePoint Online version of MegaMenus.
We suggest applying CSS changes via the following method (unless you already have a custom CSS file that you can add styles to)
- Save the CSS file to a location like /SiteAssets/CustomStyles.css
- Go to Site settings > Masterpage
- Add the URL to the CSS file to Alternate CSS URL (you may also need to check "Reset all subsites to inherit this alternate CSS URL")
Click here to download an example CSS file which will style your menus as shown below. The CSS file is commented to explain what is being changed. We can also assist with styling if you are trying to match a specific look and feel.
Visual Instructions
SharePoint navigation is defined using the out of the box navigation management, under Site Actions > Site Settings > Navigation, Under "Look and Feel". (If you do not have a "Navigation" link under "Look and feel", please enable "SharePoint Publishing Infrastructure" under "Site Collection Features". This will take a few minutes with Office 365 - do not push activate more than once.)
If a tab has the appropriate syntax for grouping then that tab is flipped over to a Mega Menu!
Create your main global navigation headings as you normally would, using the Header link.
-
Click on "Add Heading".
-
Enter a "Title" and "URL".
-
Click "OK" to save.
-
Click on "Add Link".
-
Enter a "less than" ( < ) symbol in the "Title" field of your link. This effectively starts a group. Any text entered following the left bracket becomes that group's header title (e.g.
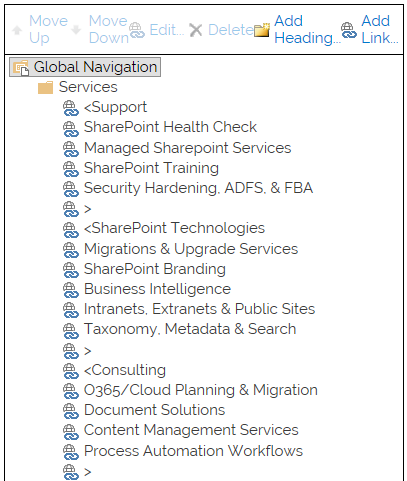
<Support, see Figure 1 and 2).
-
Alternatively, if no header title is desired, simply enter the "less than" ( < ) symbol with no text following it. This will start the column but will not create a header title.
-
The "URL" field can be any valid URL, either relative or absolute. (e.g.
/Pages/Videos.aspx or
http://www.google.com)
-
Click "OK" to save.
-
Click on "Add Link".
-
Enter a "greater than" ( > ) symbol in the "Title" field of your link. This closes a group. The "URL" field should simply be set to a "forward slash" ( / ) symbol (e.g. see Figure 3.)
-
Click "OK" to save.
-
Make sure that this link is at the bottom of the column that you want to enclose (e.g. see that it is below the CI Center link in Figure 2.)
-
You can do this by selecting the link and using the "Move Up" and "Move Down" buttons to change the links' order.
-
You can create multiple columns within the same heading. We recommend that you use no more than 3 columns in a heading, as the menu may become too wide for most standard screens.
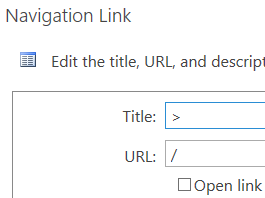
Figure 3.
The
IMG: tag specifies an image to display within a Mega Menu column.
-
Click on "Add Link".
-
In the Title Fiend, enter
IMG: and a hyperlink path to the image that you'd like to put in the Mega Menu (e.g.
IMG:/Images/Google.jpg).
-
NOTE - Bear in mind that the images
DO NOT resize, so place an image that is appropriately sized for the menu area.
-
URL field will be the image's clickable hyperlink, either relative or absolute. (e.g. URL= http://www.google.com)
-
Click "OK" to save.
-
Multiple images can be added to one group, as they will be stacked horizontally. However, you will need to test this out to see if mutiple images will fit on your menu layout.
-
You can also put the image in its own column by simply enclosing the image between a pair of opening and closing links (see Figure 2.)